Before you start, make sure you have a seller account with Arrow with the required Arrow merchant credentials.
1. Create Arrow Checkout as a custom app
To install Arrow as a ‘custom app’, you need to enable custom app development. Only the store owner can enable custom app development.
Go to Shopify admin > Go to Apps > Click 'Develop apps' > Click 'Allow custom app development' after reading the warning and information provided
Note: Arrow needs these access rights to install Arrow checkout. You can remove once installation has been completed.
Create the app
Now that you’ve enabled custom app development you can create a custom app.
- Go to Apps on the menu > Select “Develop apps”
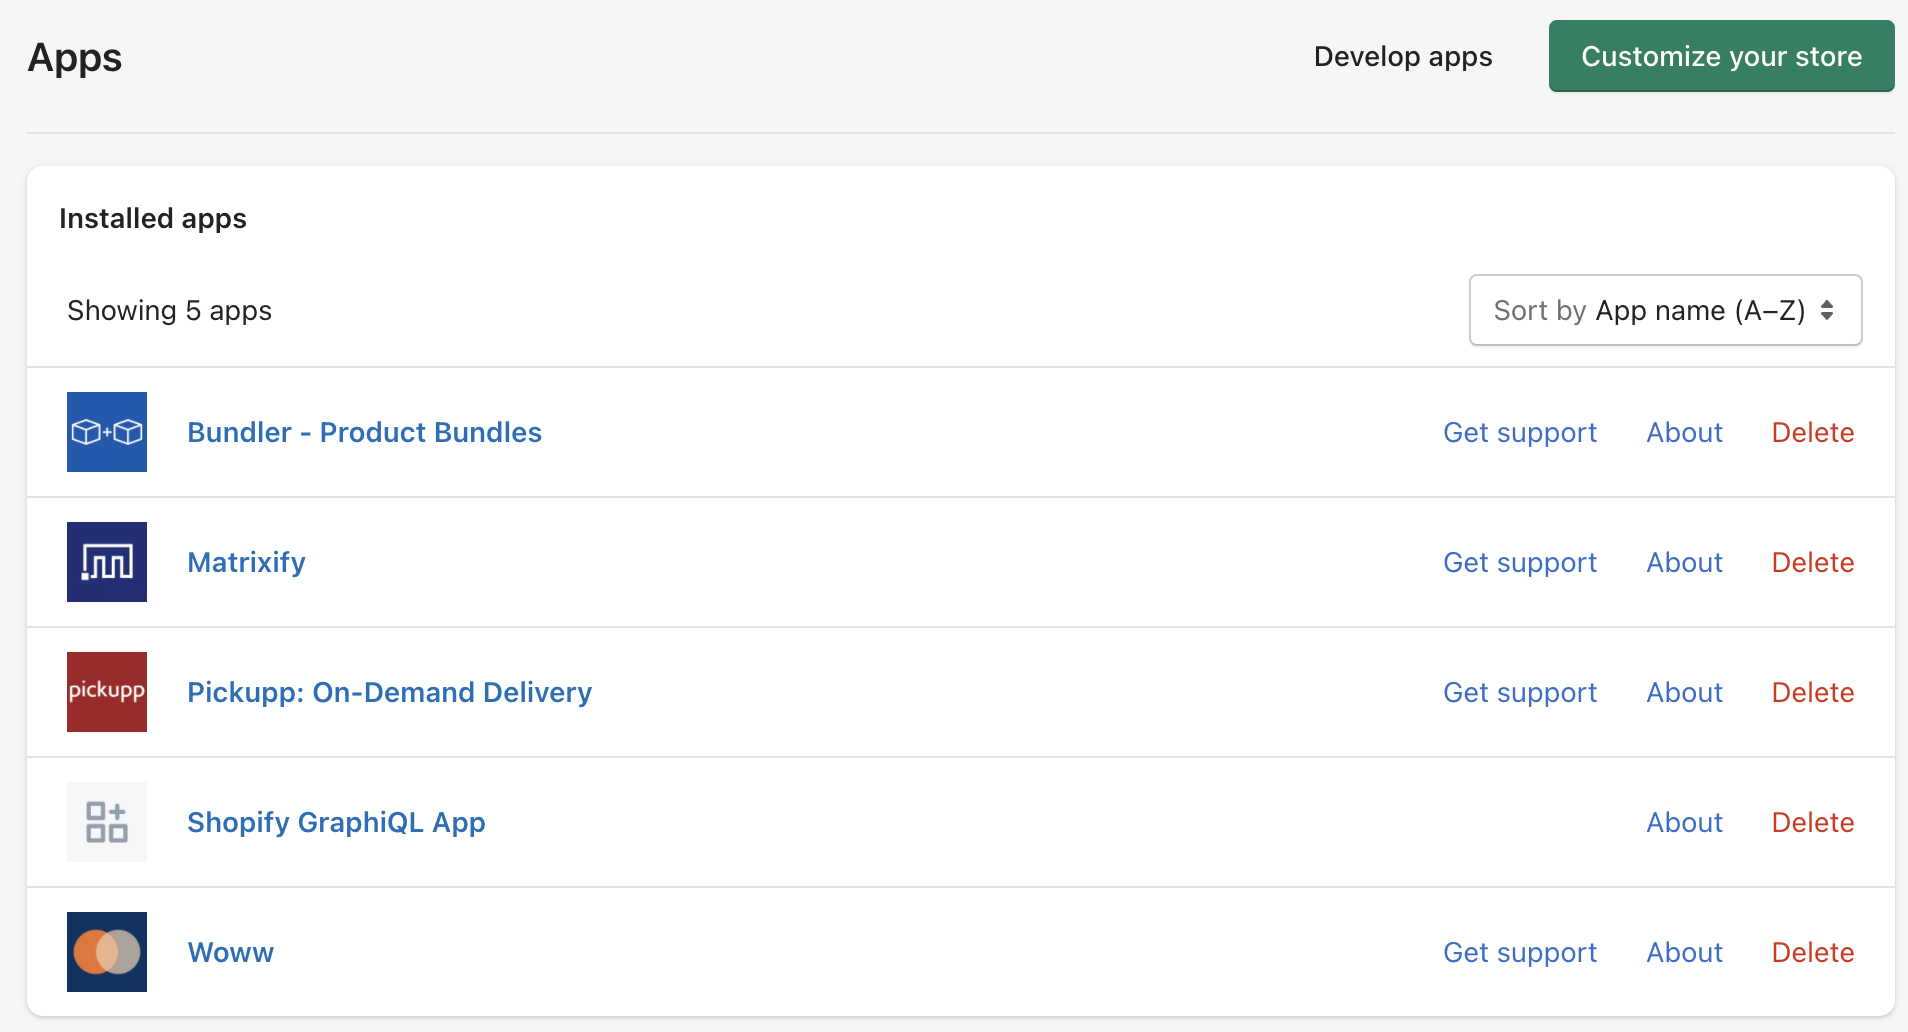
- Click "Create an App" o> Enter “Arrow checkout” as app name and "[email protected]" as app developer
2. Configure Admin and Storefront API settings
Now that you’ve created an app you have to define the app access scopes (both Admin API and Storefront API)
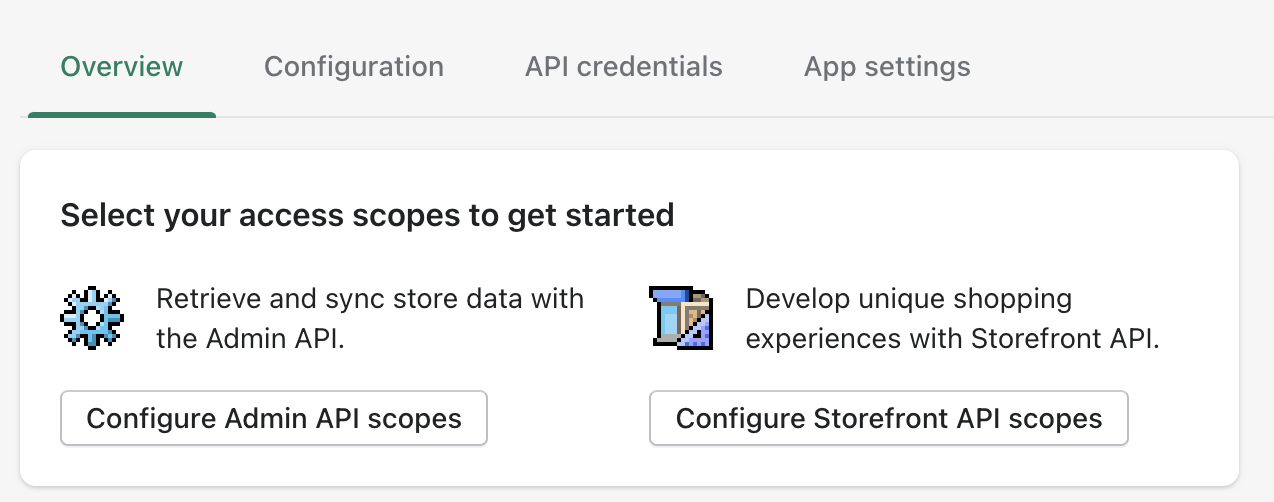
Click 'Configure' next to “Admin API Integration” section to set the following properties:
| Field Name | Access Setting |
| Customers | Read and Write |
| Discounts | Read and Write |
| Draft Orders | Read and Write |
| Fulfillment Services | Read and Write |
| Gift Cards | Read and Write |
| Inventory | Read and Write |
| Locations | Read Access |
| Online Store Pages | Read and Write |
| Order Editing | Read and Write |
| Orders | Read and Write |
| Price Rules | Read and Write |
| Products | Read |
| Shipping | Read |
| Shop Locale | Read |
| Store Content | Read and Write |
Remember to save your settings!
To enable Arrow checkout to complete orders, Click 'Configure' in ' Storefront API integration' section > Enable the following boxes under 'Storefront API Permissions':
- Checkout (required)
- unauthenticated_write_checkouts
- unauthenticated_read_checkouts
- Customers (required)
- unauthenticated_write_customers
- unauthenticated_read_customers
- unauthenticated_read_customer_tags
- Products (required)
- unauthenticated_read_product_listings
- unauthenticated_read_product_inventory
- unauthenticated_read_product_pickup_locations
- unauthenticated_read_product_tags
- Selling plans
- unauthenticated_read_selling_plans
Remember to click 'Save' to save your settings!
3. Add the 'Admin API Access Token' and 'Storefront API Access Token' to Arrow
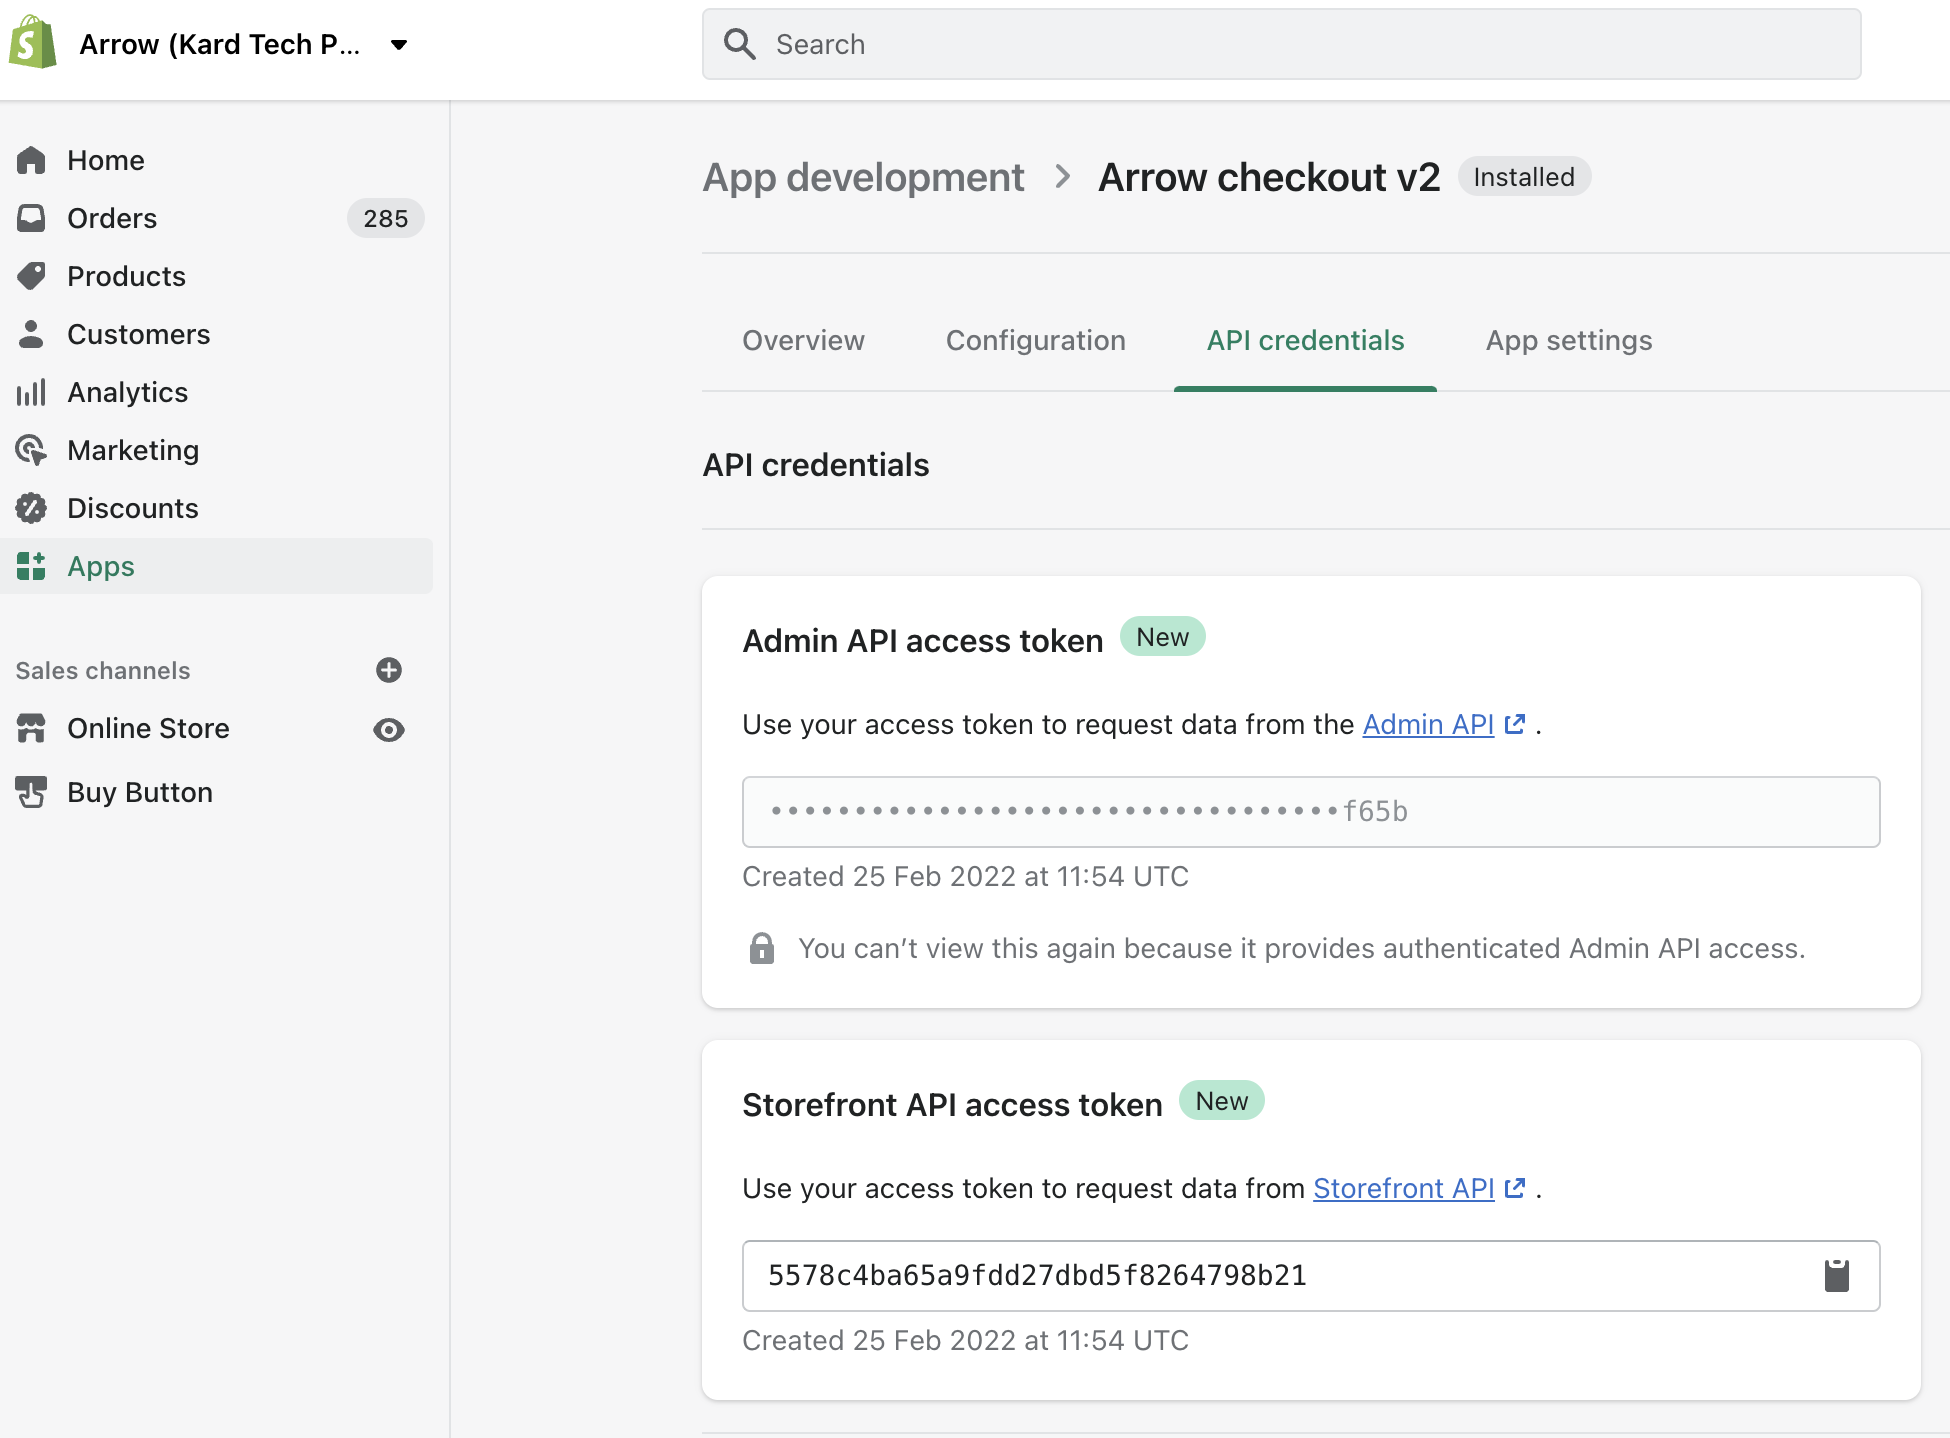
For Arrow checkout to effectively work on your store, you need the the Shopify API tokens to interface Arrow with your Shopify store.
Your 'Admin API Access Token' and 'Storefront API Access Token'
Go to your Arrow custom app page to save the Shopify Admin API Access Token and Storefront API Access Token in a safe place. We recommend you use a password manager. You will need the API Key for Arrow to connect with your Shopify store.
Your Store ID
Copy the Shopify Store ID from your admin’s browser address bar, that is
“{{store_id}}.myshopify.com"
Also copy your Store ID found in the browser address bar when in the Shopify portal.
Share the Admin API Access Token, Storefront API Access Token and Store ID with the Arrow dev team. They will add the details to the seller account in Arrow. Please note you need to share this only once with the Arrow dev team.
4. Add arrow.js to the theme.liquid file
Modify your Shopify theme to allow Arrow checkout button to appear in your store. Add the arrow.js client library and encryption library to your checkout pages.
Modify your theme
Go to “Sales Channel” > Go to My Store > Select “Themes” > Go to section “Current Theme” > Select “edit code” in the Actions dropdown:

On the “Edit Code” page, open the file “theme.liquid”:

Add the following script tags in the tag:
Note: Make sure to replace {{your arrow client key}} with the Arrow client key for this store.
<script src="//ajax.googleapis.com/ajax/libs/jquery/3.6.0/jquery.min.js"></script>
<script type="text/javascript" src="https://shop.witharrow.co/cdn/arrow.js"></script>
<script
  defer
  type="text/javascript"
  src="https://arrow-cdn.s3.amazonaws.com/media/button/v1.03/arrow-button.js"
></script>
<script>
    jQuery(document).ready(function(){
      initArrow({
        clientKey: "your arrow client key"
      });
    });
</script>
<script>

  var clientId = 0;

  function getCookieUTM(name) {
    const value = `; ${document.cookie}`;
    const parts = value.split(`; ${name}=`);
    if (parts.length === 2) return parts.pop().split(';').shift();
  }

  function getCookie(cname) {
    let fbp = document.cookie.split(';').filter(c => c.includes('_fbp=')).map(c => c.split('_fbp=')[1]);
    let fbc = document.cookie.split(';').filter(c => c.includes('_fbc=')).map(c => c.split('_fbc=')[1]);
    fbp = (fbp.length && fbp[0]) || undefined;
    fbc = (fbc.length && fbc[0]) || undefined;

    if(!fbc && window.location.search.includes('fbclid=')){
      fbc = 'fb.1.'+ (+new Date()) +'.'+ window.location.search.split('fbclid=')[1];
    }
    if (cname == "_fbp") {
      return fbp
    } else if (cname == "_fbc") {
      return fbc
    }
  }

function arrow_checkout_clicked() {
 fetch('/cart.js')
  .then(response => response.json())
  .then(data => {
    var fbp = getCookie('_fbp');
    var fbc = getCookie('_fbc');
    clientId = ga.getAll()[0].get('clientId');

    var cartAll = data.items;
      var cpAmt = 0;

      for (i = 0; i < cartAll.length; i++) {
        var curOptions = "";
        if (cartAll[i].variant_options != undefined){
          for (j = 0; j < cartAll[i].variant_options.length; j++) {
            curOptions += cartAll[i].variant_options[j];
            if (j < cartAll[i].variant_options.length - 1){
              curOptions += " , ";
            }
          }
        }

        cpAmt += cartAll[i].total_discount/100;

        arrowOrder.items.push(
          {
            name : cartAll[i].title,
            quantity : cartAll[i].quantity,
            image: cartAll[i].image,
            description : cartAll[i].product_description,
            option : curOptions,
            extraData : {"variant_id": cartAll[i].variant_id, properties: cartAll[i].properties}
          }
        );
      }

      if (cpAmt > 0) {
        arrowOrder.coupon = {"amount" : cpAmt}
      }

      arrowOrder.shipping =[
      ];

      var deliveryTime = $("input[name^='attributes[Delivery Time']").attr("name");
      var deliveryDateVal = $("input[name='attributes[Delivery Date]']").val();
      var deliveryTimeVal = $("input[name^='attributes[Delivery Time']").val();
      var deliveryDayVal = $("input[name='attributes[Delivery Day]']").val();
      var note_attributes = {};

      if (deliveryTime != undefined) {
        var matches = deliveryTime.match(/(\[(?:\[jQuery3210290589496665961_1645086608211[^\[]*?\]))/g);

        if (matches.length > 0) {
          var raw = matches[0].replace(/^\[(.+)\]$/,'$1')
          note_attributes[raw] = deliveryTimeVal;
        }
      }
      if (deliveryDateVal != undefined){
        note_attributes['Delivery Date'] = deliveryDateVal;
      }
      if (deliveryTimeVal != undefined){
        note_attributes['Delivery Time'] = deliveryTimeVal;
      }
      if (deliveryDayVal != undefined){
        note_attributes['Delivery Day'] = deliveryDayVal;
      }
      var notes = $("textarea[name='note']").val();

      arrowOrder.extraData = {};

      if (note_attributes != {}){
        arrowOrder.extraData['note_attributes'] = note_attributes;
      }
      if (notes != undefined){
        arrowOrder.extraData['notes'] = notes;
      }
      arrowOrder.redirect = {
        "success" : window.location.origin + "/pages/order-successful",
        "fail" : window.location.origin,
        "cancel" : window.location.origin + "/cart"
      }

      if (document.getElementsByClassName("cpn_dcnt_price")[1] != undefined) {
      	arrowOrder.promocode = document.getElementsByClassName("cpn_dcnt_price")[1].childNodes[0].innerText;
      }

      // arrowOrder.currency = {
      //   "base_currency": "IDR",
      //   "currency_symbol": "Rp"
      // }

      // arrowOrder.extraData['locale'] = "id";

      if(fbp !== undefined){
        arrowOrder.extraData['fbp'] = fbp;
      }

      if(fbc !== undefined){
        arrowOrder.extraData['fbc'] = fbc;
      }

      arrowOrder.extraData['event_source_url'] = window.location.href;

      if (clientId != 0){
        arrowOrder.extraData['clientId'] = clientId;
      }

    const params = new URLSearchParams(decodeURIComponent(getCookieUTM('_shopify_sa_p')));
    var utmInfo = {};
    var utmSource = '';
    var utmMedium = '';
    var utmCampaign = '';
    var utmTerm = '';
    var utmContent = '';
    arrowOrder.extraData['utmSource'] = params.get('utm_source');

    if(params.has('utm_source')){
     utmSource = params.get('utm_source');
     utmInfo.utmSource = utmSource;
    }

    if(params.has('utm_medium')){
     utmMedium = params.get('utm_medium');
     utmInfo.utmMedium = utmMedium;
    }

    if(params.has('utm_campaign')){
      utmCampaign = params.get('utm_campaign');
      utmInfo.utmCampaign = utmCampaign;
    }

    if(params.has('utm_term')){
      utmTerm = params.get('utm_term');
      utmInfo.utmTerm = utmTerm;
    }

    if(params.has('utm_content')){
      utmContent = params.get('utm_content');
      utmInfo.utmContent = utmContent;
    }

    arrowOrder.extraData['utmInfo'] = utmInfo ;

    launchArrowShopify();
  });
};
      const open = window.XMLHttpRequest.prototype.open;

      function openReplacement() {
        this.addEventListener("load", function () {
          if (
            [
              "/cart/add.js",
              "/cart/update.js",
              "/cart/change.js",
              "/cart/clear.js",
            ].includes(this._url)
          ) {
            cartJS = JSON.parse(this.response);
          }
        });
        return open.apply(this, arguments);
      }

      window.XMLHttpRequest.prototype.open = openReplacement;

      (function(ns, fetch) {
          if (typeof fetch !== 'function') return;

          ns.fetch = function() {
              const response = fetch.apply(this, arguments);

              response.then(res => {
                  if ([
                          `${window.location.origin}/cart/add.js`,
                          `${window.location.origin}/cart/update.js`,
                          `${window.location.origin}/cart/change.js`,
                          `${window.location.origin}/cart/clear.js`,
                      ].includes(res.url)) {
                      res.clone().json().then(data => cartJS = data);
                  }
              });

              return response;
          }

      }(window, window.fetch))

</script>
If you are setting up Arrow via Arrow QA environment, you have to replace this script:
<script type="text/javascript" src="https://shop.witharrow.co/cdn/arrow.js"></script>
with the following snippet:
 <script>
    const arrowHost = "https://qa-hi.projectarrow.co";
	const arrowAPI = "https://qa-yo.projectarrow.co/api";
  </script>
<script type="text/javascript" src="https://qa-hi.projectarrow.co/cdn/arrow.js"></script>
and
Note: weight: cartAll[i].grams / 1000, is needed only if your product has weight data. If it does not apply to your product, please skip this step.
Click ‘Save’ in the upper right corner to save these changes.
Note: jquery is mandatory if your site doesn’t yet have jquery installed. If you’re unsure, please reach out to the Arrow dev team.
At times, we need to add the Shopify GET cart ajax call when calling arrow_checkout_clicked() to ensure we get the cart’s items.
function arrow_checkout_clicked() {
 fetch('/cart.js')
  .then(response => response.json())
  .then(data => {
    var cartAll = data.items;
     .........
    launchArrowShopify();
  });
};
If you'd like to enable localized language for the checkout, you have to add the following code after 'arrowOrder.extraData' has been defined in the function:
Note: we currently offer only Bahasa Indonesia & English
arrowOrder.extraData['locale'] = "id";
5. Add 'successful' or 'canceled' handlers
We add these handlers to direct shoppers to the right page after checkout to view whether their checkout has been completed or canceled.
Go to ‘Layout’ folder > Go to ‘theme.liquid’ file to add the following script within the tag:
<script>
    var checkoutWindow;

    function checkout_cancel() {
      window.location.href = window.location.origin + "/cart";
    }

    function checkout_success() {
      window.location.href = window.location.origin + "/pages/order-successful";
    }

    window.addEventListener("message", function(event) {
      var data = event.data;
      if (data && data.message) {
        if (data.message == "checkout_success") {
            checkout_success();
        } else if (data.message == "checkout_cancel") {
            checkout_cancel();
        }
      }
    });
    var cartJS = {{cart | json }};
</script>
6. Add the 'Arrow checkout' button on the cart page
Load the required arrow.js in the Shopify theme, then add the 'Arrow checkout' button on the cart page.
Load the checkout button to enable 'Arrow checkout' on the cart page. Depending on the Shopify theme installed on your website, you can add the 'Arrow checkout' button in different areas of the Shopify code. Please note that the code may look different based on the theme you have.
Recommended setup:
Go to “Sections” folder > Open the file “cart-template.liquid” to customize the Shopify cart page while in the code editor for your theme. Use the following code for the 'Arrow checkout' button:
<div class="arrow-checkout-block"></div>
The code will create a button that looks like the following:
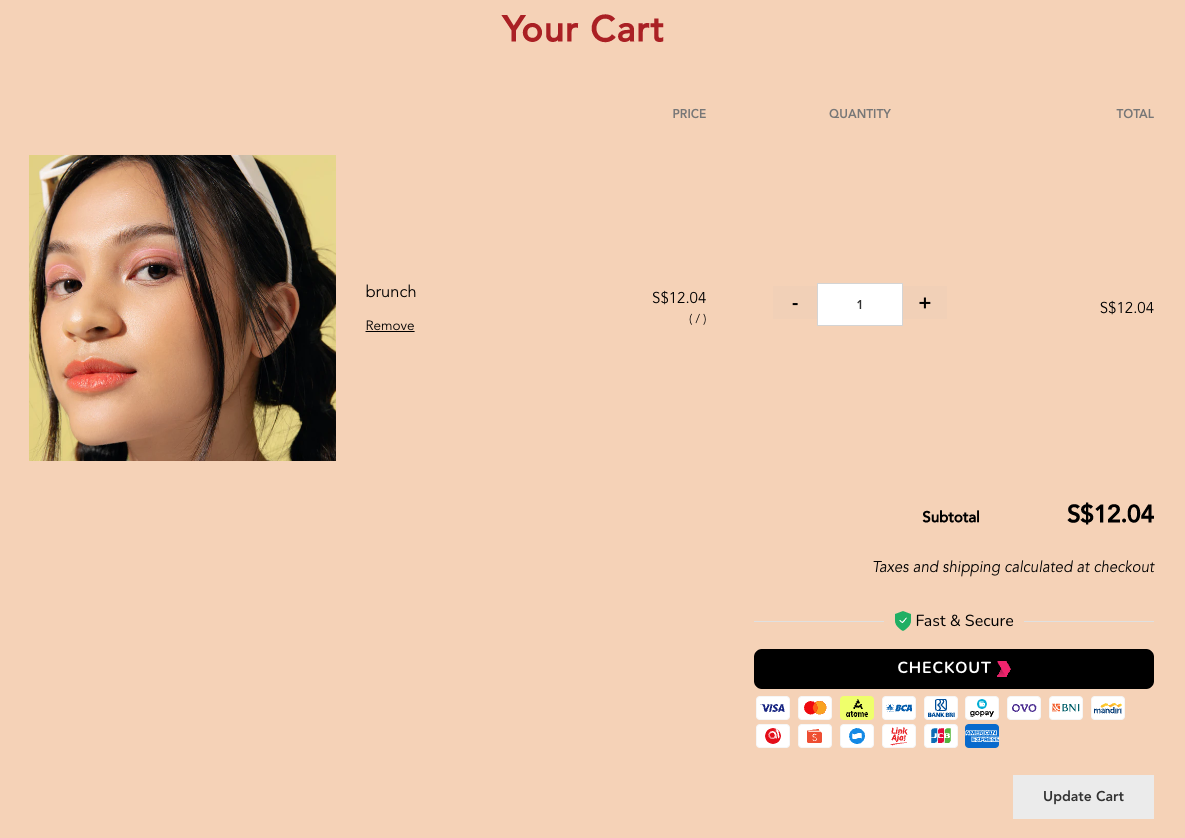
You can decide the best position for the 'Arrow checkout' button on your page.
Recommendation: The 'Arrow checkout' button works best when it is just above your existing checkout button on the cart page. Your existing cart is known as “'cart.general.checkout'”. Insert the Arrow line of code above your existing Shopify checkout code block.
You can easily adjust the style according to your site theme.
Remember to click ‘Save’ in the upper right corner to save these changes to the ‘cart-template.liquid’ file.
And, here are the possible data value for arrow-checkout-block:
| Data Value | Description |
| data-type |
Default = none
If set to "product" it will call the function buy() instead of arrow_checkout_clicked() |
| data-brand-visa | Show/Hide Visa Branding; Default = false; values = "true"/"false" |
| data-brand-master | Show/Hide Mastercard Branding; Default = false; values = "true"/"false" |
| data-brand-paynow | Show/Hide Paynow Branding; Default = false; values = "true"/"false" |
| data-brand-jcb | Show/Hide JCB Branding; Default = false; values = "true"/"false" |
| data-brand-union | Show/Hide Union Branding; Default = false; values = "true"/"false" |
| data-brand-american | Show/Hide American Express Branding; Default = false; values = "true"/"false" |
| data-brand-atome | Show/Hide Atome Branding; Default = false; values = "true"/"false" |
| data-brand-grab | Show/Hide GrabPay Branding; Default = false; values = "true"/"false" |
| data-brand-fpx | Show/Hide FPX Branding; Default = false; values = "true"/"false" |
| data-brand-cimb | Show/Hide CIMB Branding; Default = false; values = "true"/"false" |
| data-brand-maybank | Show/Hide Maybank Branding; Default = false; values = "true"/"false" |
| data-brand-bank_bri | Show/Hide Bank Rakyat ID Branding; Default = false; values = "true"/"false" |
| data-brand-bca | Show/Hide Bank Central Asia Branding; Default = false; values = "true"/"false" |
| data-brand-bni | Show/Hide Bank Raykat Indonesia Branding; Default = false; values = "true"/"false" |
| data-brand-shopppay | Show/Hide ShopeePay Branding; Default = false; values = "true"/"false" |
| data-brand-link_aja | Show/Hide LinkAja Branding; Default = false; values = "true"/"false" |
| data-brand-ovo | Show/Hide OVO Branding; Default = false; values = "true"/"false" |
| data-brand-dana | Show/Hide Dana Branding; Default = false; values = "true"/"false" |
| data-brand-akulaku | Show/Hide Akulaku Branding; Default = false; values = "true"/"false" |
| data-brand-mandiri | Show/Hide Mandiri Branding; Default = false; values = "true"/"false" |
| data-brand-permata | Show/Hide Permata Branding; Default = false; values = "true"/"false" |
| data-brand-touch_n_go | Show/Hide TouchNGo Branding; Default = false; values = "true"/"false" |
Mini cart/Side cart (optional):
If you have a side cart/mini cart, you can add the same code to the section. Side/mini cart code is usually located under “Snippet”, with file title containing “cart” , for e.g. mini-cart.liquid.
<div class="arrow-checkout-block"></div>
Extra notes
- At times, mini cart is only rendered when it is toggled to open, and therefore the initial arrowInit() function called would not have the opportunity to attach the CSS and JS code to arrow-checkout-block inserted in mini cart. We would need to re-trigger the arrowInit() function after the mini cart is properly rendered in such a situation.
- You can leverage the
data-scriptslabel to call a custom function upon completing of button load, when there are additional CSS treatment to be done on the checkout button. For example:
<script>
function arrow_add_css() {
      var arrowElement = document.getElementsByClassName('reset-this arrow-f arrow-fc arrow-jsb')[0];
      arrowElement.style["margin-left"] = "auto";
      arrowElement.style["margin-right"] = "0"
}
</script>

<div class="arrow-checkout-block" data-scripts="arrow_add_css()"></div>
7. Add 'Arrow checkout' button on the product page
Configuration of the 'SKU' button depends on your store's theme on Shopify. You can use the following steps to generate an 'SKU' button when you use the Basic Theme.
Go to 'Section' folder > Go to “product-template.liquid” file to locate “Add to Cart” button code. Note: The file could be a custom snippet nested within the product-template.liquid file.
Note: You can download the entire theme file to search for the 'buy' button using your editor of choice, for e.g., sublime text. This is useful when the 'buy' button is in a different file.
Next, add the following code snippet (Note the additional data-type=”product” needed, which will call the buy() function instead of arrow_checkout_clicked())
<div class="arrow-checkout-block" data-type="product"></div>
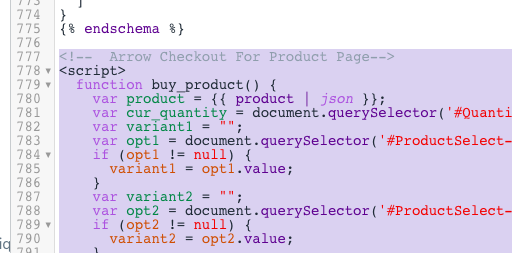
After completing this step, add another code snippet at the very end of the same “product-template.liquid” file. You can add this on the bottom of the page, at line 775 or below if there is code already on this line.
Here's the code snippet to add:
<!--  Arrow Checkout For Product Page-->
<script>
  function getQueryParam(name) {
    var q = window.location.search.match(new RegExp('[?&]' + name + '=([^&#]*)'));
    return q && q[1];
  }

 function buy() {
   var clientId = 0;
   var fbp = getCookie('_fbp');
   var fbc = getCookie('_fbc');
   clientId = ga.getAll()[0].get('clientId');

   var product = {{ product | json }};
   var cur_quantity = document.querySelector('input[aria-label="Quantity"]').value;
   var variant_title;

   var product_variants = product.variants;
   var variant_id = 0;
   var weight = 0;
   var image = null;

   if (getQueryParam('variant') != null) {
     for(var i=0;i < product_variants.length;i++) {
       if (product_variants[i].id == getQueryParam('variant')){
         variant_id = product_variants[i].id;
         variant_title = product_variants[i].title;
         image = product_variants[i].featured_image;
         weight = product_variants[i].weight;
         break;
       }
     }
   } else {
     for(var i=0;i < product_variants.length;i++) {
			 if (product_variants[i].available){
         variant_id = product_variants[i].id;
         variant_title = product_variants[i].title;
         image = product_variants[i].featured_image;
         weight = product_variants[i].weight;
         break;
       }
     }
   }

   if (!!image) {
        image = image.src;
   } else {
        image = "https:" + product.images[0];
   }
   if (variant_id == 0){
     variant_id = product.variants[0].id;
     variant_title = product.variants[0].title;
     weight = product.variants[0].weight;
   }
   arrowOrder.items.push(
     {
       name : product.title,
       quantity : cur_quantity,
       image: image,
       weight: weight / 1000,
       description : product.description,
       option : variant_title,
       extraData : {"variant_id":variant_id, properties: product.properties}
     }
   );
   arrowOrder.shipping =[
   ];
   arrowOrder.extraData = {
     "cart_id": 1
   };
   arrowOrder.redirect = {
     "success" : window.location.origin + "/pages/order-successful",
     "fail" : document.location.href,
     "cancel" : document.location.href
   }


   if(fbp !== undefined){
     arrowOrder.extraData['fbp'] = fbp;
   }

   if(fbc !== undefined){
     arrowOrder.extraData['fbc'] = fbc;
   }

   arrowOrder.extraData['event_source_url'] = window.location.href;

   if (clientId != 0){
     arrowOrder.extraData['clientId'] = clientId;
   }

    const params = new URLSearchParams(decodeURIComponent(getCookieUTM('_shopify_sa_p')));
    var utmInfo = {};
    var utmSource = '';
    var utmMedium = '';
    var utmCampaign = '';
    var utmTerm = '';
    var utmContent = '';
    arrowOrder.extraData['utmSource'] = params.get('utm_source');

    if(params.has('utm_source')){
     utmSource = params.get('utm_source');
     utmInfo.utmSource = utmSource;
    }

    if(params.has('utm_medium')){
     utmMedium = params.get('utm_medium');
     utmInfo.utmMedium = utmMedium;
    }

    if(params.has('utm_campaign')){
      utmCampaign = params.get('utm_campaign');
      utmInfo.utmCampaign = utmCampaign;
    }

    if(params.has('utm_term')){
      utmTerm = params.get('utm_term');
      utmInfo.utmTerm = utmTerm;
    }

    if(params.has('utm_content')){
      utmContent = params.get('utm_content');
      utmInfo.utmContent = utmContent;
    }

    arrowOrder.extraData['utmInfo'] = utmInfo ;

   launchArrowShopify();
 }
</script>
Note: weight: weight / 1000, is needed only if your product has weight data. If it does not apply to your product, please skip this step.
If you use a custom theme, please make the edit in the above code since custom themes have different configuration.
Look for the code we have provided you within the “buy” function. The code is in the section close to the bottom:
arrowOrder.items.push(
     {
       name : product.title,
       quantity : cur_quantity,
       image: image,
       weight: weight / 1000,
       description : product.description,
       option : variant_title,
       extraData : {"variant_id":variant_id, properties:product.properties}
     }
   );
When you use a custom theme, you need to build this exact data depending on the theme. You need to adapt these fields to fit your theme's configuration.
Note: For fetching variant and quantity data:
Look for product quantity by fetching quantity spinner / dropdown value, for example:
document.querySelector('#ProductSelect-product-template-option-1').value
Or
document.querySelector('.js-qty__num').value
Look for product variants in the theme.js or theme.js.liquid files for variant change triggers. Pass the selected variant data to 'product-template.json' code.
If querySelector doesn't fetch updated quantity, you can pass quantity data from theme.js or theme.js.liquid files. Look for product quantity triggers to pass the updated quantity to 'product-template.json' code.
For using jQuery to select the existing selected value from a <select> tag:
var opt1 = $("select#SingleOptionSelector-0").children("option:selected").val();
Example of fetching variant value where options are provided in a list, and the currently selected one having assigned an active class:
var opt1 = document.getElementsByClassName('lh-swatch-select lh-exists active')[0];
if (!!opt1) {
   variant1 = opt1.dataset.value;
}
Another way to fetch the right variant if the other methods fail is fetch the variant id from the back of the URL is to use the following function to insert into product.liquid
 function getQueryParam(name) {
    var q = window.location.search.match(new RegExp('[?&]' + name + '=([^&#]*)'));
    return q && q[1];
  }
For handling sold out buttons and hide Arrow checkout button:
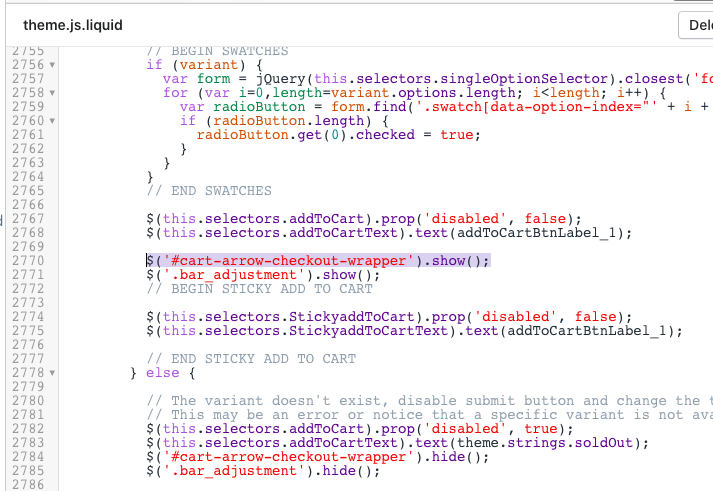
Go to theme.js.liquid file, and look for _updateAddToCart function (look for “updateAddToCart”, as sometimes it could be slightly different, such as “_updateAddToCartButton”)
Assign the product page Arrow checkout block a special ID, and use show() or hide():
$('#cart-arrow-checkout-wrapper').show();
$('#cart-arrow-checkout-wrapper').hide();
to show and hide the Arrow checkout button according to the case. \
At times, we ought to try looking for the SKU-change function in theme.js/theme.js.liquid, passing it an arrowVariant variable so that we can just conveniently obtain the right variant that is being selected when the buy() function is triggered.
For example, the currently selected variant might be initialised under the function _getVariantFromOptions(), with any changes in selection made by user triggered under function _onSelectChange.
8. Add 'successful order' page
Create a successful order page as a template that will be served to shoppers to confirm their orders have been successful.
Add the template
Go to “Templates” folder > Click “Add a new template” link at the top of the list to create a new template > Select “page” and select “liquid” as template type > Name the template “checkout-success”. (ie. page.checkout-success.liquid)
Add the new script on the first line of the newly saved template:
<script>
	$(window).on('load', function () {
		$.ajax({
         type: "POST",
         url: '/cart/clear.js',
         success: function(){ window.location.replace(window.location.origin + "/pages/thanks-for-your-order");  },
         dataType: 'json' });
	});
</script>
Once added, your template should look like this:
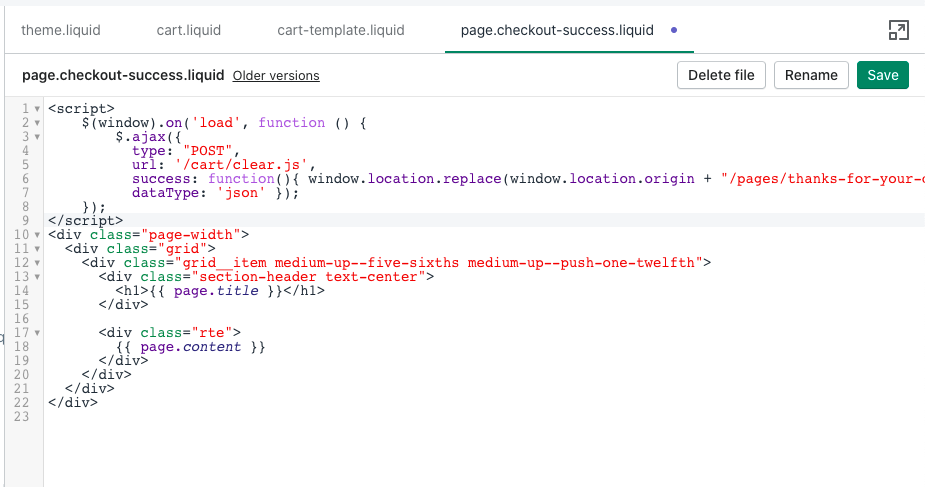
Remember to “Save” the changes after you have added the text.
Add the page
Create two new pages for user to land on once the template has been generated. Go to “Pages” in the left menu:
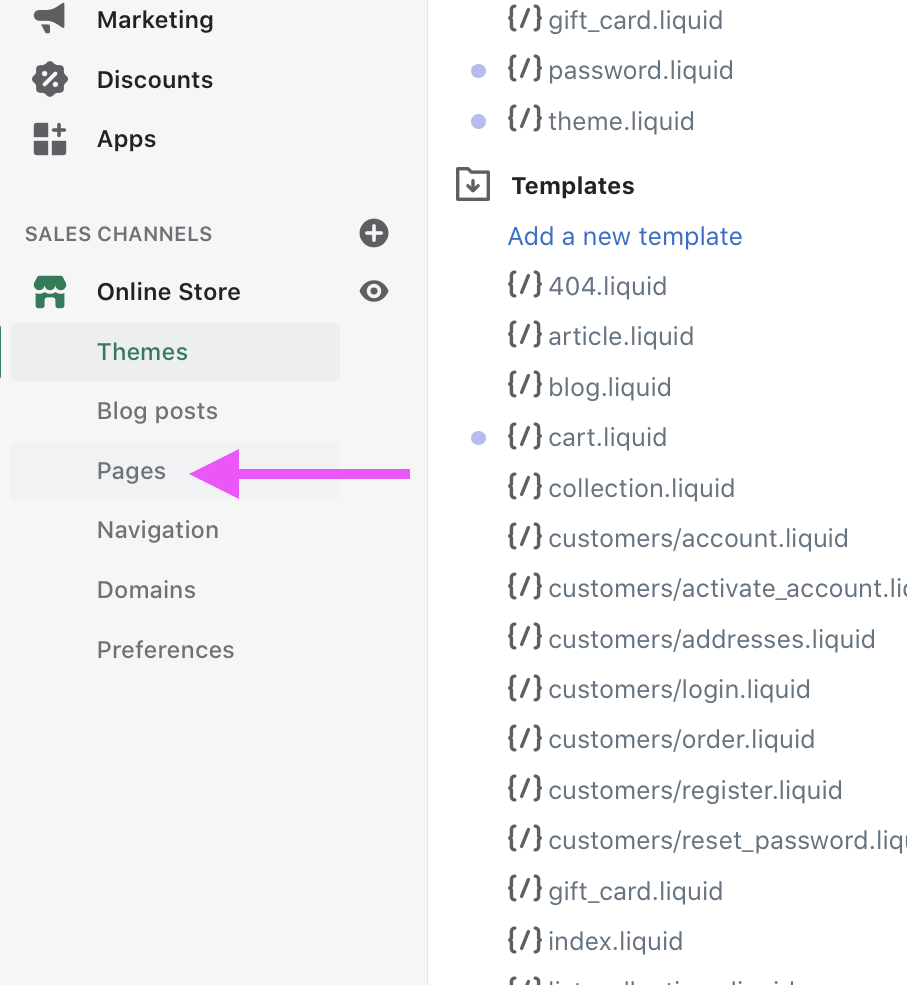
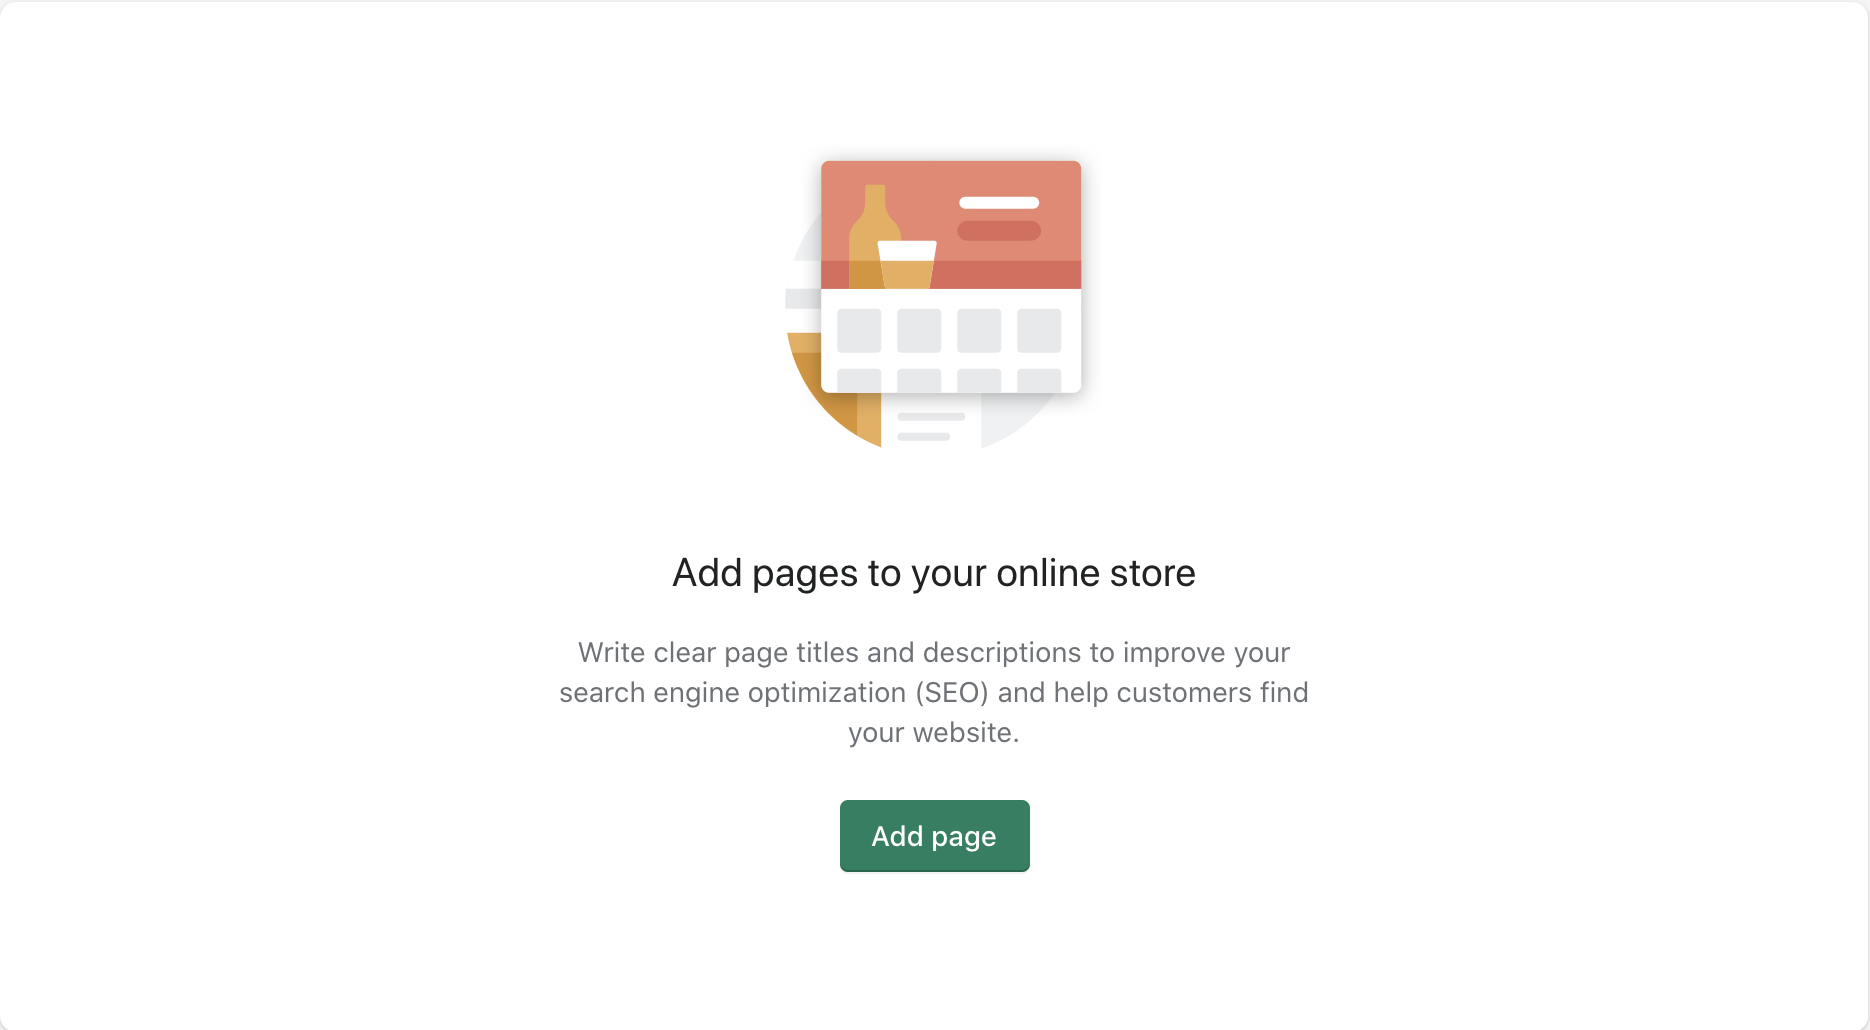
If you have not previously created any new pages, you will arrive at an empty page. Simply click“Add page” button to create a new page.
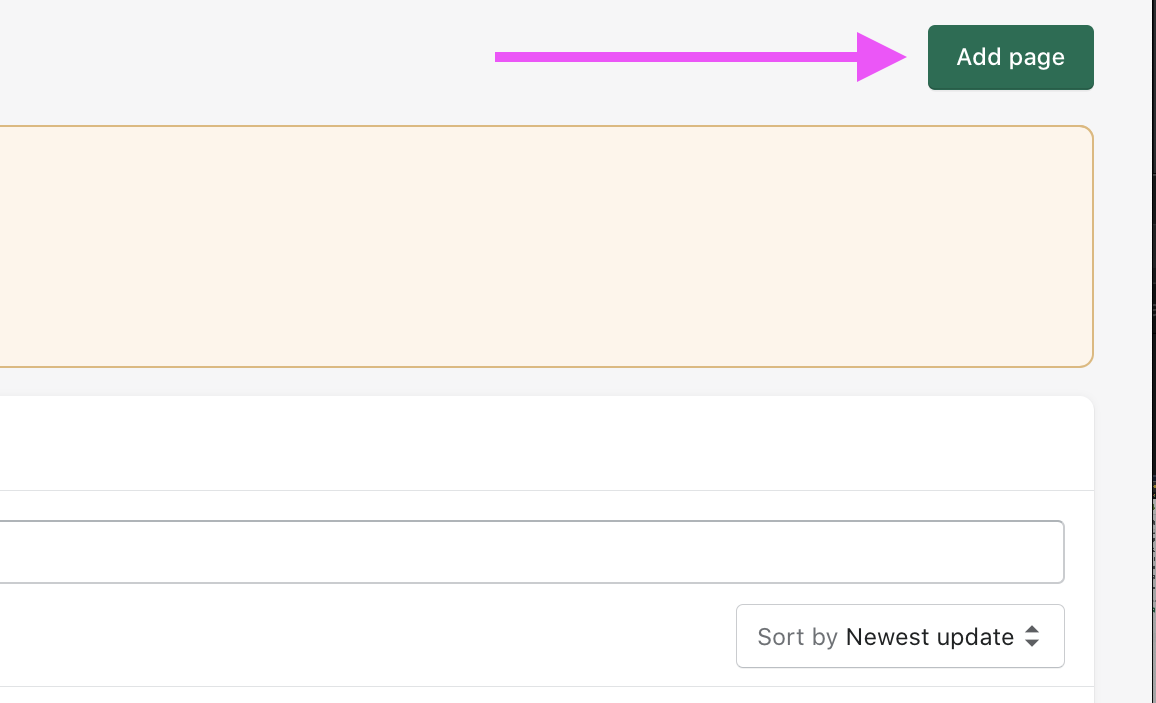
If you have previously created new pages, select “Add page” button on the top right to get started.
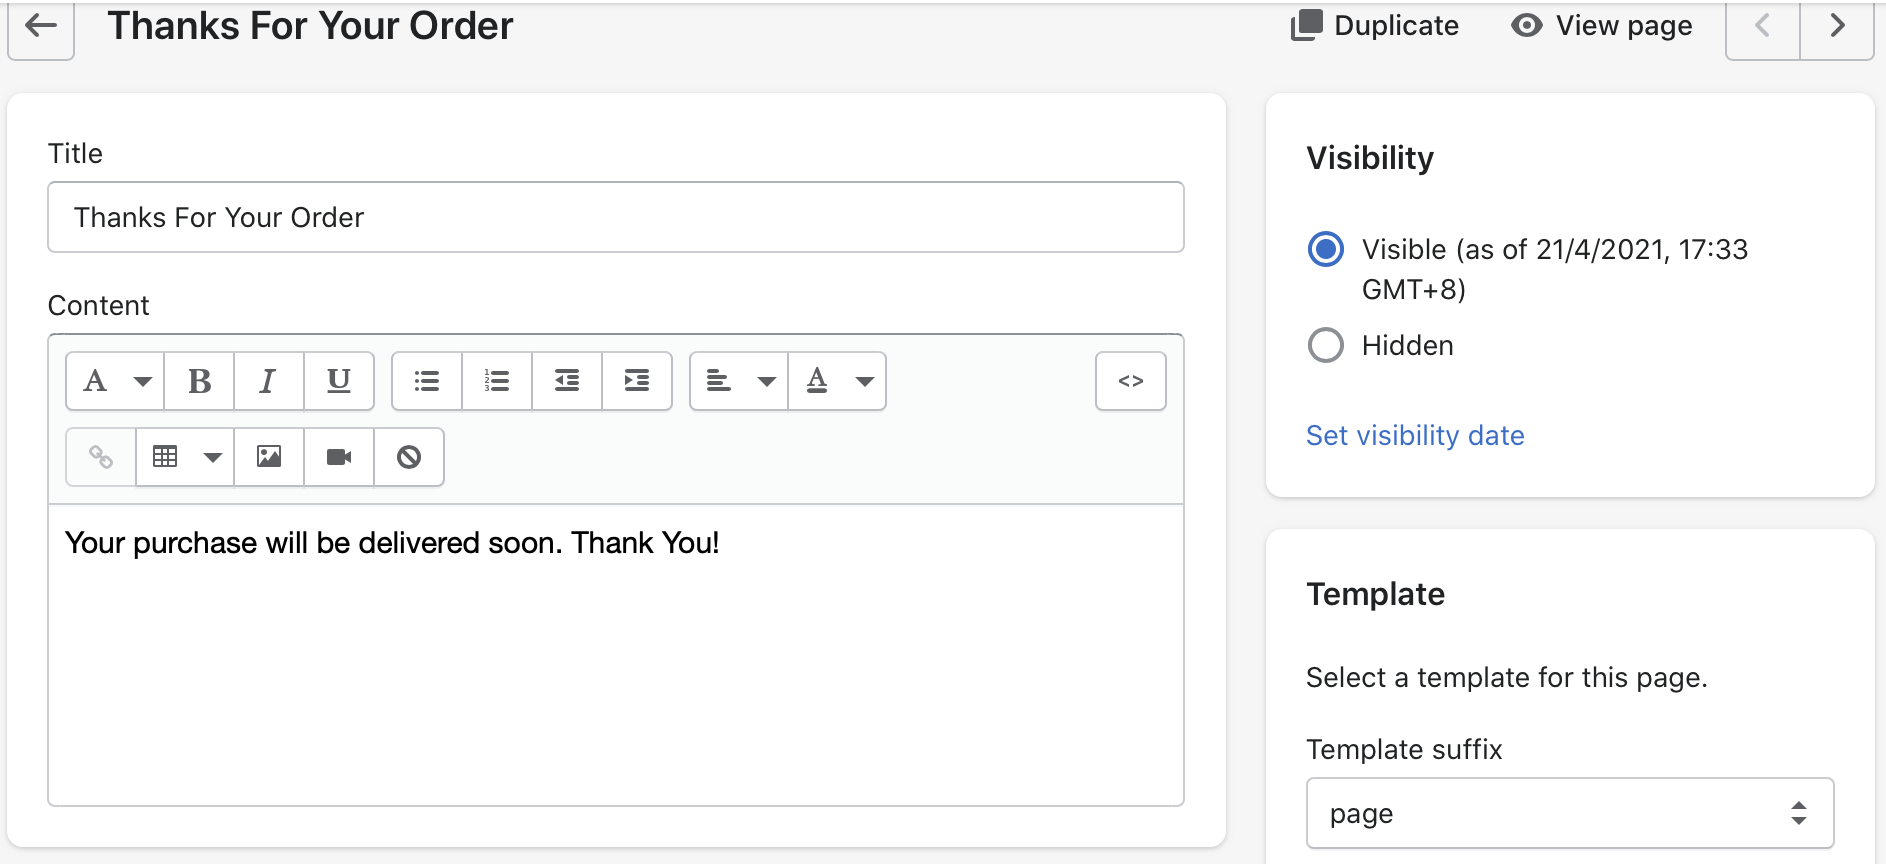
This will redirect you to a set of fields that need to be filled. For the first page, set the Title to “Thanks For Your Order” and the Content to “Your purchase will be delivered soon. Thank You!” The page should look like this:
Remember to click “Save” to save the new page.
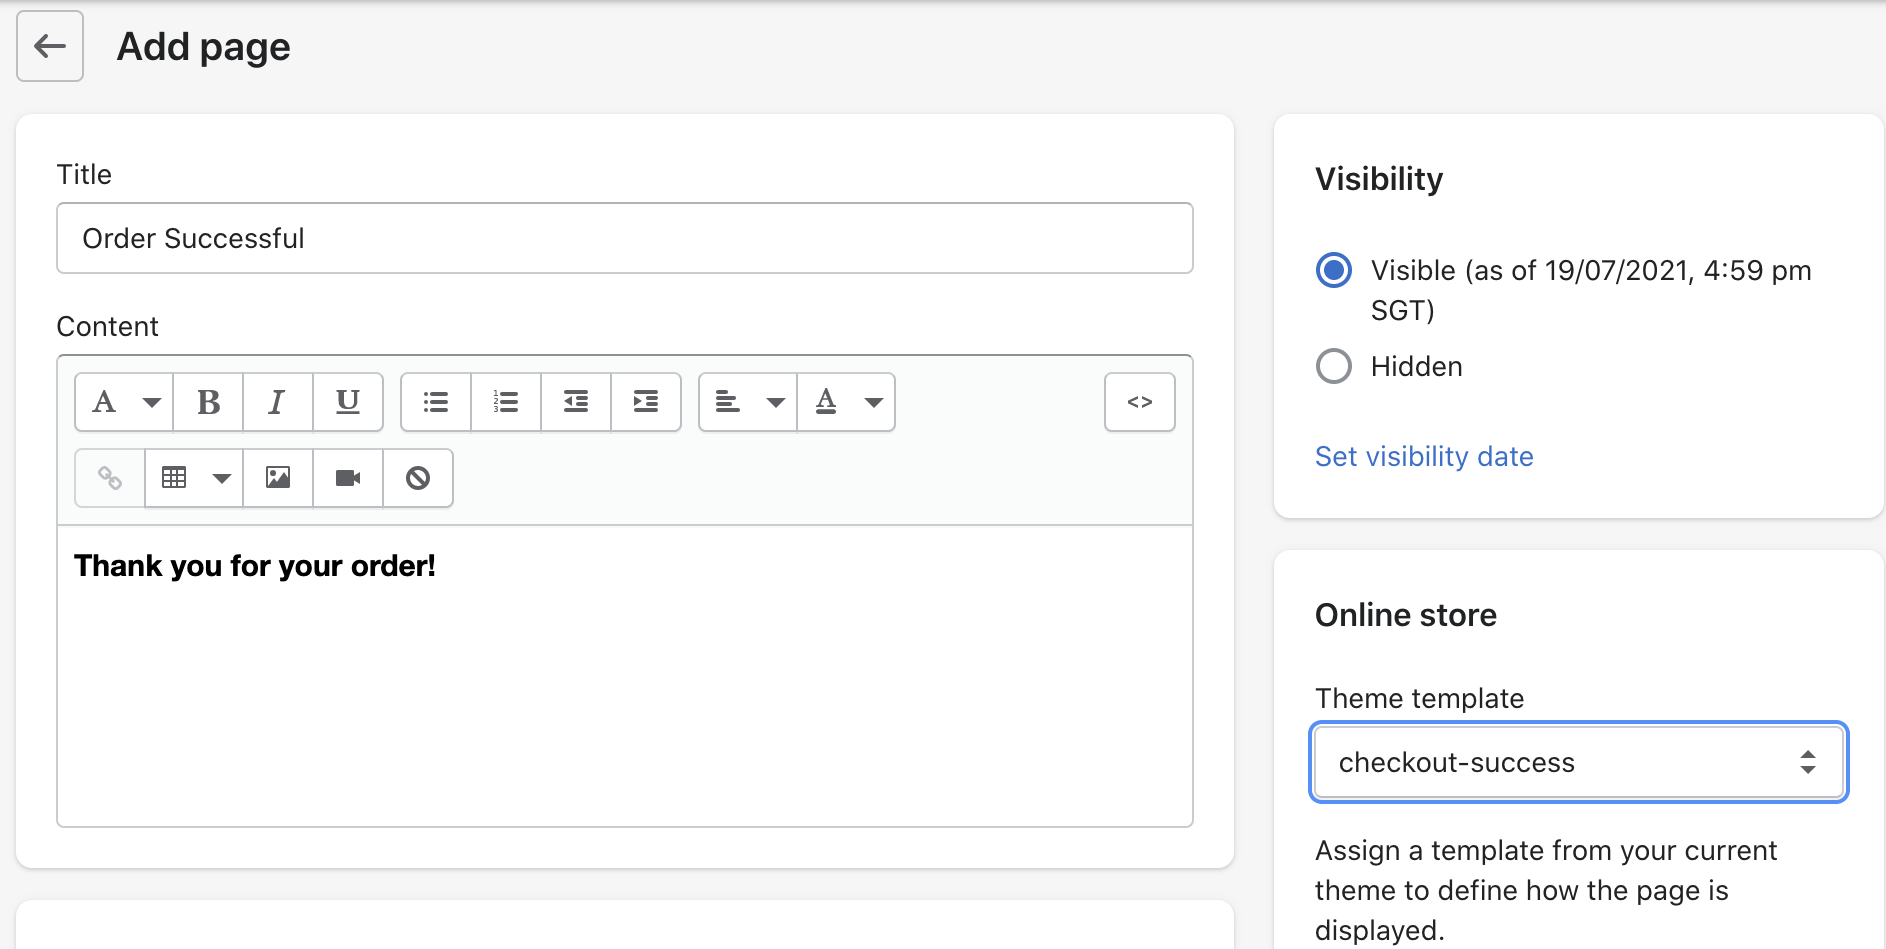
Return to “Pages” site > Select “Add page” button to create the second new page. For this page, set the Title to “Order Successful” and the Content to “Thank you for your order!”
Once the theme is published to live, the additional change for this page is: in the right menu go to “select a template for this page” and select the template you just created -> “checkout-success” from the dropdown. This page will clear the customer cart after the order is confirmed. The page should look like this:
Remember to click “Save” to save the settings.
Remember that only the “Order Successful” page should have the template changed. Not both pages.
9. Connect Arrow with Shopify webhooks
There are certain events that happen on Shopify that needs to be notified to Arrow so that Arrow can perform the necessary next steps: a key example being, when a refund is initiated on the Shopify dashboard, to process the refund via the merchant-installed gateway.
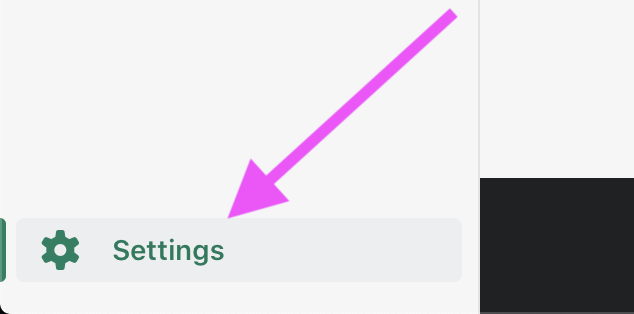
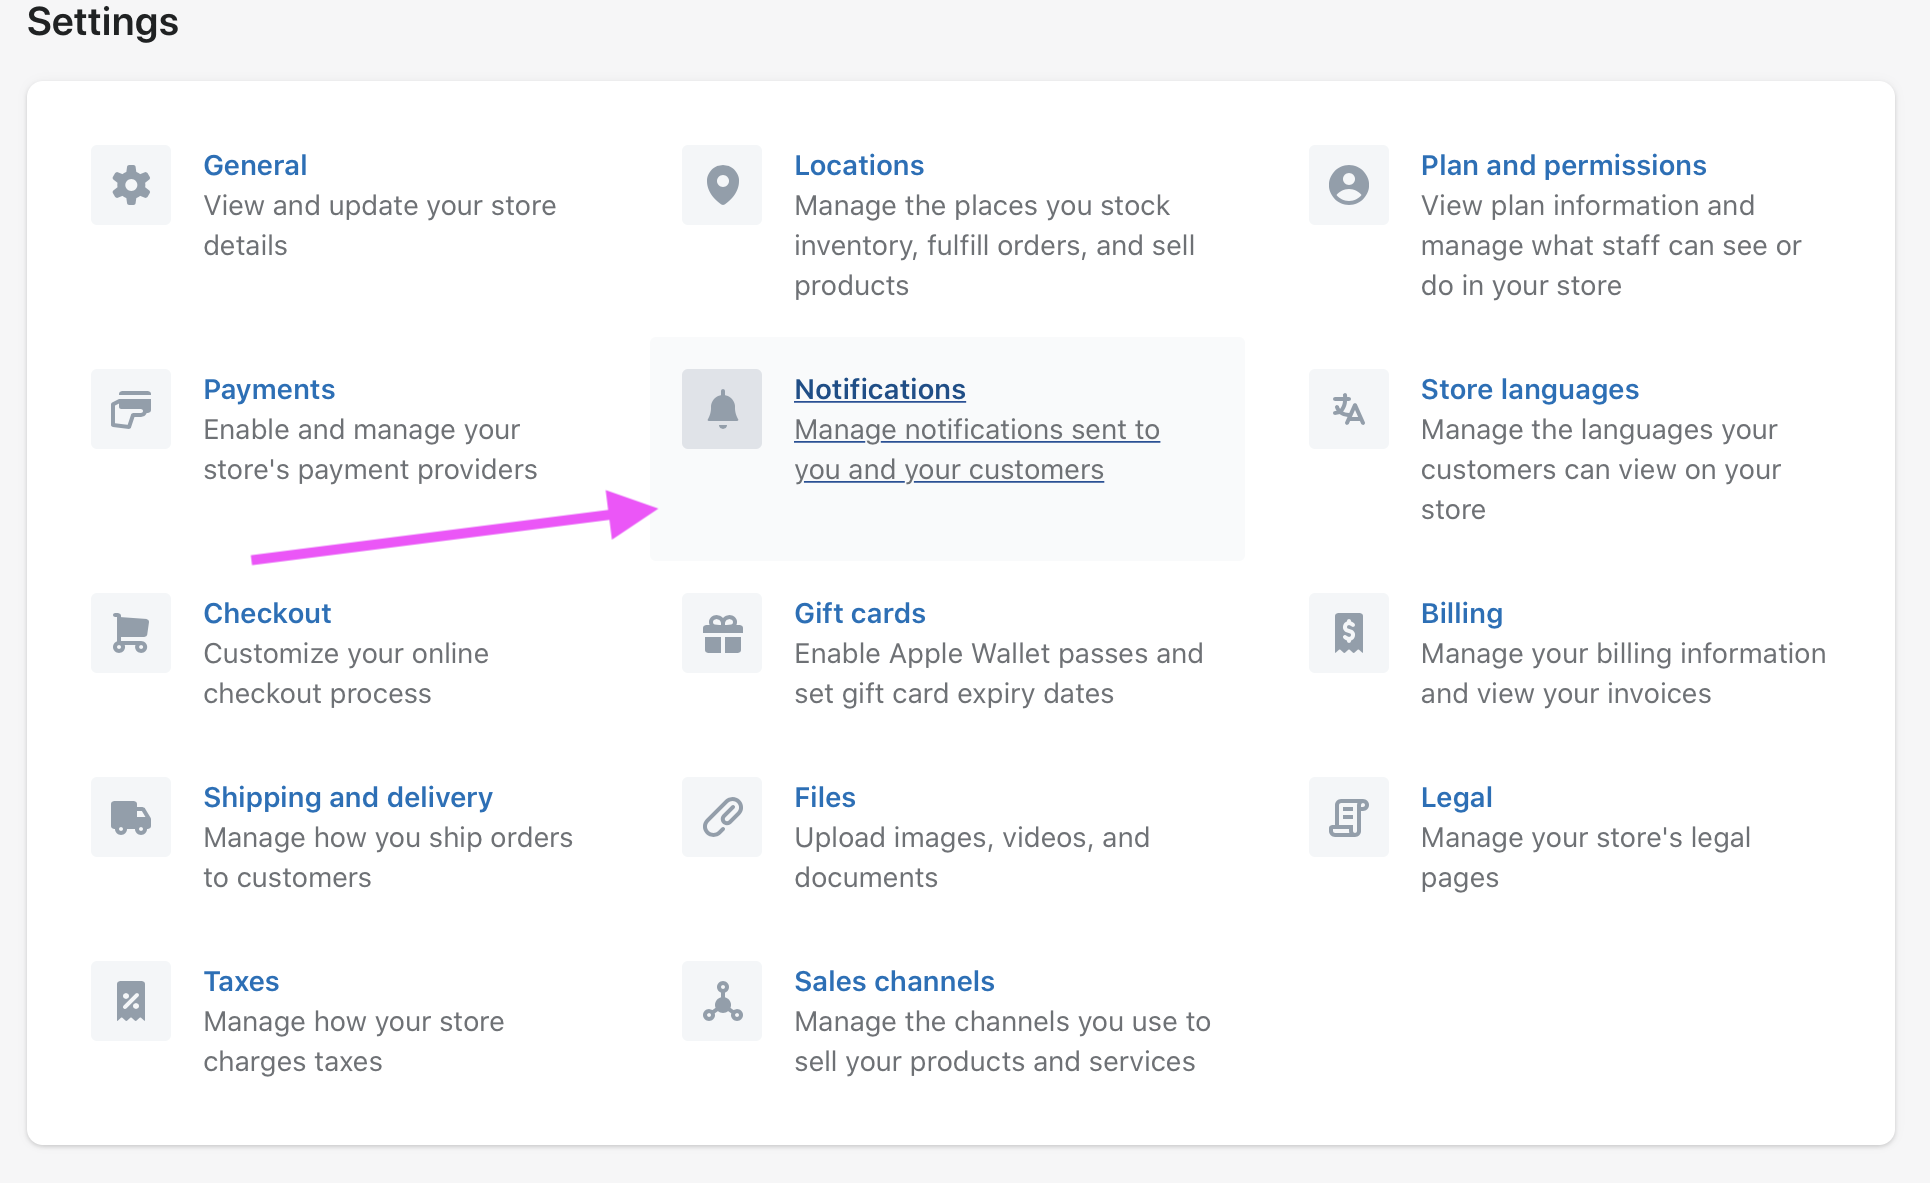
Go to Settings > Go to Notifications menu > Scroll to the Webhooks section > Create 'Webhook' to get started:
Enter the following in the URL:
http://stg-yo.projectarrow.co/api/webhook/shopify/{{ your client key }}
Note: If you install for production usage, endpoint would instead be <https://fly.witharrow.co/api/webhook/shopify/{{> your client key }}
Replace {{your client key}} with the Arrow API client key.
Select the latest stable version for API version, and ‘JSON’ for format
Do the same for the following events, and use the same URL for each:
“Order creation”
“Order fulfillment”
“Order Cancellation”
“Refund create”
You should now have 4 webhooks configured for:
- Order cancellation
- Order creation
- Order fulfillment
- Refund create

Congratulations! Once you have completed these steps, you would have successfully added Arrow Checkout for your Shopify Store.
Try checking out on y our store with Arrow to verify that you have successfully completed the installation.
Confirm that the ‘Checkout with Arrow’ button is displayed on your cart. Check out your shopping cart items with 'Checkout with Arrow' to complete your order.
💬 We're here to help!
If you encounter any issues, please first confirm if you have correctly configured the settings provided in this guide. Reach out to Arrow support at ( [email protected] ) for help with your setup if your settings are accurate and you still encounter issues.
